Showing posts with label jennifer perkins. Show all posts

Thursday, August 22, 2013

Up-Cycling A Puzzle Into a Picture Frame


I'm slightly obsessed with gallery walls. I've been in the new house 1 month today ad already have 4.5. Today I made a new personalized addition to one of those gallery walls using a vintage puzzles, Tacky Dots and Instagram photos.
Read more »

Friday, August 16, 2013

Spreading the Crafty Cheer at My New Crib

I have been in my new house a couple of weeks now. Sure, there are still boxes in the garage and plenty of knick-knacks that have yet to find a home - but my I Love to Create Crafts are settling in just fine. Crafts make the casa so I have been sprinkling the handmade goodness all around my new abode.
Read more »

Thursday, August 1, 2013

Tie-Dye T-Shirt Necklaces

If you find yourself near a Hobby Lobby this Saturday chances are good that you might come across an I Love to Create blogger like myself whipping up some tie-dye magic. This coming Saturday I'll be in Round Rock and would love to see your smiling face. Bring your own pre-washed T-shirt and I'll get it all dyed up for you. After all of these demos I am amassing quite the collection of tie-dye shirts. My husband has incorporated them in to his wardrobe happily, but I stole a few from his drawers and decided to make them into jewelry. You know me, if it will sit still long enough I will make it into jewelry.
Read more »

Thursday, July 18, 2013

Home Goods Fabric Covered Ottoman Hack


I spend way too much time in Home Goods. Like the cashiers know me by name. Recently they have had a lot of fabulous items from India that have been catching my eye. Case in point, this ottoman. Problem was the ottoman is $70. The rugs are $7. I kept thinking their had to be a way to make my own version and I was right.

Read more »

Sunday, July 7, 2013

Mixed Media - How to Get the Entire Family Involved

I have had this giant canvas living in my garage for quite sometime. I spotted the picture at a Goodwill and thought: "one day I will do something with this". With my impending move it was time to make a life choice. I can't pack and move every "maybe one day" item in my garage. It was too hot to play outside so I decided to play mixed media in the AC with the kids instead.
Read more »

Thursday, June 27, 2013

Simple Shadow Box Show and Tell


So my husband Chris is not really a hero in the eyes of most, but to our family he is. Anyone who gets up at 5:30am with the kids and let's me sleep until 8:30 is a hero in my book. He's also a medal winner. Not for courage, but for canoeing. Sure, he came in 3rd place - but he still got a fun medal. I thought I would show him what a hero he is to us by whipping up this easy shadowbox.

Supplies

Aleene's Tacky Dots

Shadow Box Style Picture Frame

Scissors

Decorative Paper

Objects to Frame (medal and photo)

First I cut my scrap book paper to fit inside my frame.

Next I used Aleene's Tacky Glue Dots to adhere my Instagram picture to the paper.

One of the things I love about these Tacky Dots is that they are strong enough to hold something as heavy as a made in China 3rd place canoeing medal.

All that was left was to put the back on this frame and sit it on a shelf. I can't wait to make a photo wall in Chris's new home office when we move. This simple shadow box will be the perfect addition.

Thursday, June 20, 2013

Summer Spoons Starburst Mirror


I just bought a new house I am itching to decorate. Top things on the list new couches, subway tile backsplash and fancy hallway mirror. I'm thinking tile and couches will be tricky to DIY. However, a starburst mirror is totally doable..

Supplies

Aleene's Tacky Glue

Hot Glue and Gun

Pink Serving Spoons

Pink Serving Tray

Pizza Tin

Round Mirror

The hardest part of this project is getting the price tags off the plastic spoons. I scored mine at the party store and it took soap, hot water, scrubbing, olive oil, alcohol and finally WD40 to get the sticky off. Once you have clean spoons, the rest of the project is super duper easy.

What you use as a base for your mirror is totally up to you. I used a combination of acrylic neon pink serving tray and pizza pan. Use Tacky Glue to adhere these two parts together. Next using Tacky Glue attach your mirror to the center.

Lay your spoons out around the edge of your mirror and choose a pattern. Remember you want as much spoon as possible to touch the base (more contact to glue).


Using a hot glue gun attach your spoons around the edge.

All that was left to do was hang my mirror. The new house has a pool, I'm thinking this little gem might go on the patio.

Tuesday, May 28, 2013

Tie-Dye Hawaiian Onesie


Summer is here and it is time to start sporting your hula skirts and/or Hawaiian shirts. Last week I showed you how I tie-dyed Tallulah's hula skirt, this week I wanna show you what I whipped up for Baxter. Boys can get into the spirit of the luau too, just you wait and see.

SUPPLIES

Onesie

Tulip One-Step Tie-Die Kit

Floral fabric

Scissors

Fabric Fusion Peel and Stick Tape

If your onesie is brand new you will need to wash it first.

The Tulip One-Step Tie-Die Kit comes with oodles of rubber bands and an easy to follow diagram about how to bind your onesie to get your desired pattern. I went for the twist into a shell shape.

Once your onesie is bound with rubber bands it is time to apply the dye. I went with a rainbow effect adding a different color to each section of the 'pie'. Allow to sit overnight. The next morning wash according to package directions.

I wanted to add a lei to the onesie to tie my Hawaiian theme together. Like any red blooded mother, I love it when my kids match. I chose a floral cotton fabric.

The next step is to cut out enough flowers to make a lei. Using Fabric Fusion tape attach your flowers to the onesie in the shape of a necklace.

All that was left to do was slap this new outfit on my cutie pie of a son. I think he looks ready for the luau. What about you?

As always thanks to my crafty mama Fredda Perkins for all her help!

Thursday, May 23, 2013

Tie-Dye Hula Skirt Tutorial

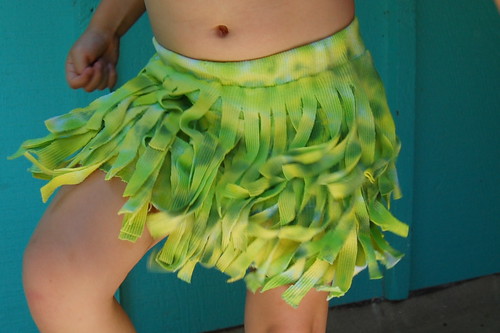
Nothing says sumer quite like tie-dye. The bright colors, the cheery abstract designs and the ease of dying all make summer fashion fun. Always looking to set my tots apart from the rest of the playground I decided to make them Hawaiian themed tie-dye outfits. This will be a 3 part series that includes a hula skirt, tank top and onesie with leigh. First up, the hula skirt!
SUPPLIES

Old T-shirts or tank tops

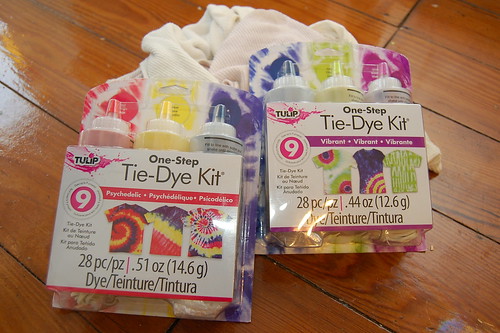
Tulip One Step Tie-Dye Kits

Scissors

Sewing Machine
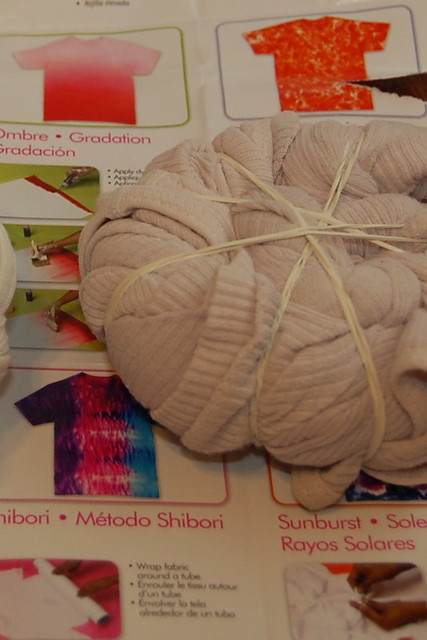
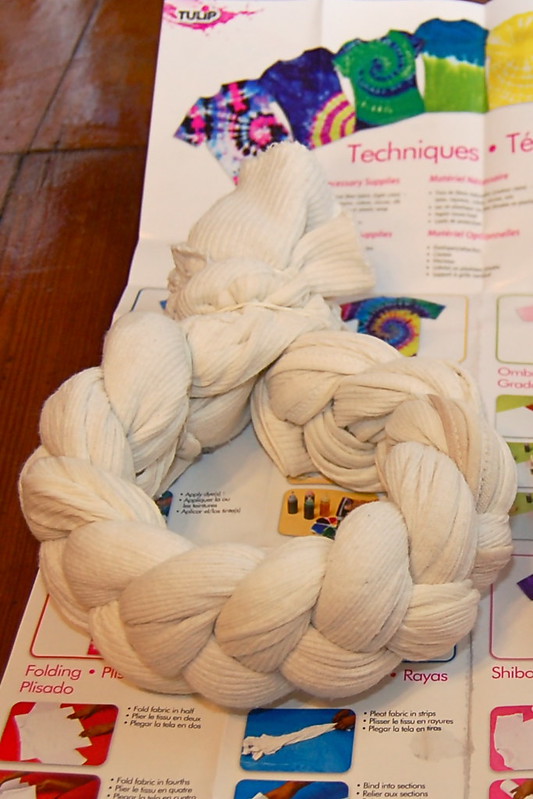
Let me start by saying: this was my first attempt at tie-dye. I have to say it was so stinkin' easy my 4 year old helped. We are talking wrap cloth with rubber bands, squirt with dye, go to bed, wake up and rinse, dry and wear easy. I'm totally a tie-dye convert. When selecting your material to dye, think natural. I went with some old undershirt tank tops of mine that were headed for the rag pile.
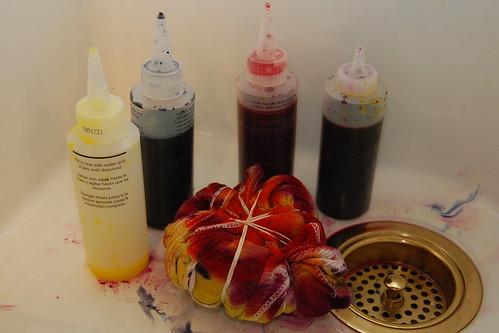
The Tulp One step Tie-Dye Kit comes with super easy to follow instructions that walk you through achieving various tie-dye patterns. I was using 3 tank tops for my shirt so I went with a braid. I used the rubber bands included in the kit to hold everything together.
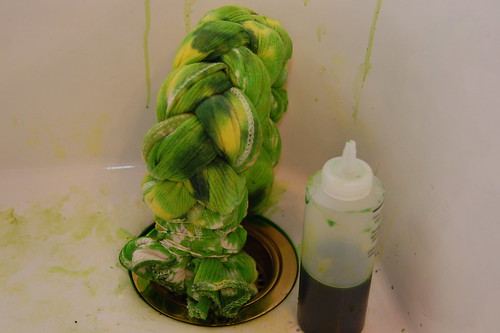
Next I put my braided shirts into the sink. The kit comes with quirt bottles that all you have to do is add water. I used two kits. One had lime green and the other had blue and yellow which I combined to make another shade of green. Coat your braid making sure to A) get into the folds and B) Not over saturate. I wanted contrast so that the material would look like grass for my grass skirt.
The dye needs to sit on your material for 6-8 hours so I went to bed and let everything work it's magic. In the morning I cut my rubber bands off and popped my tanks in the washing machine. Now I just needed them to be dry so I (or my mother rather) could start sewing.
This skirt was inspired by a post I saw on Make It and Love It. Ashley made an ombre style skirt using different red shirts. I saw the fun her daughter was having twisting and turning and I knew Tallulah needed to hula. Check out her site to learn how to make your skirt. Be sure to catch the next 2 installments where I'll walk you through making a matching tie-dye halter top and a tie-dye onesie complete with leigh for little brother.