Showing posts with label DIY Style. Show all posts

Wednesday, June 26, 2013

DIY American Flag-Inspired Shorts


Fourth of July is right around the corner, and if you're like me you want to look fly for the holiday weekend..
.
because let's face it Jeshua...you're single and you need to make an effort... at some point.  
 -_-


The other day I was shopping at an overpriced boutique store - and by shopping, I mean looking at everything saying "I could make that"- and I came across some denim cut-offs with an American (USA) Flag pattern painted on it.

I decided to do my own take on the painted denim. It's subtle enough to be worn all summer long and patriotic enough to be an Independence Day statement piece.

– A pair of denim shorts
– Sand paper
– Painter's tape

DIY Glittered Body Art

Whenever I am at the boardwalk I see booths set up where you can get temporary glitter tattoos or other kinds of body art. As a little kid the thought of having glitter and butterflies all over my arms and face sounded rather delightful. Tulip’s body art is great because instead of paying someone for a one time tattoo you can get multiple stencils and colors that can be used time and time again. It is great for going to the beach, the pool, a party, or a sleepover with your friends. I have wanted to showcase Tulip Body Art in a tutorial for a long time now, so I hope you enjoy it and make some awesome designs of your own! 
What you need:
Blue Glitter
Silver Glitter
Adhesive
Small brush
Large brush
Dragonfly Stencil
Body Crystals
Remove stencil from backing and adhere to skin.  Rub gently to make sure there are no air pockets.
Brush glue on open areas of stencil.  We left stencil on for the next step, you can opt to remove it according to instructions.
Dip brush into glitter and pounce/pat into stencil. A generous helping is good!  We used blue for the body, head and wing tips and silver for the inside of the wings.  You have to work quickly or the glue will dry. It is similar to eyelash adhesive.
Remove stencil.  Use larger brush to gently brush off any excess glitter.
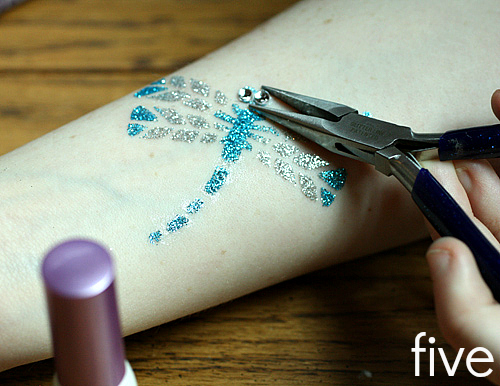
Use tweezers, pliers or a crayon to pick up crystals.  Dip them into glue and gently adhere to eyes of dragonfly.  Add more if you like!
That's it!  These are so easy and fun!  I'm going to bring them to my next sleepover and share them with my BFF!  I really love them and best of all, I love that they last several days, but not forever.  
We'd love to see what you do with Tulip Body Art!  Visit us on Facebook and share your photos.  And visit my mom at DIY Doyenne for more fashion and style!

Monday, June 17, 2013

DIY Dolce and Gabbana Inspired Shoes

 Ever since I bought these cork wedges a few years ago, I've been planning on adding some painted details to the sides.  Time got away from me, but as soon as I saw the Dolce and Gabbana Sicilian Folk Art Collection for Spring/Summer, I knew I had to get these babies painted up!  Inspired by folk art carved and painted details on antique wagons, the D and G version of these shoes are stunning  Haute Couture artworks  They're also on "sale" for 1600 dollars...which is still light years beyond my budget.  Sigh.

Our house is decorated in what I call Folk Art Chic, with tons of little details like these.  I even have a Folk Art Chic Pinterest board!  I knew exactly what I wanted to do.  Since the shoes were cork, I used Tulip Soft Fabric paints and a little Aleene's Spray Acrylic sealer.  It took under an hour to turn a plain pair of wedges into a fashion statement of my own.  Using stencils for the flowers made quick work of those larger details.  If you look at the originals, you'll see that they're not perfectly perfect, they're meant to look handmade.  That took a lot of pressure off of me when painting, and I've got to say, I think these details turned out even more precise than the originals!  

What you need:
Cork or fabric wedges (try to find some that are solid cork and not just a thin layer wrapped around the wedge)
Tulip Soft Fabric Paint in yellow, red, green, white and turquoise
Aleene's Spray Acrylic Sealer Matte Finish
Tulip Flexible Body Art Stencils in Fantasy
Scissors
Painter's tape
Small detail paint brushes

1.) Tape of bottoms and tops of shoes exposing only the cork.  Use your fingernail to press tape into the grooves and seal.  2.)  Start with the yellow arcs, these go along the top of shoe first, then add white dots using the tip of your paintbrush.  3.)  Fill in the open spaces in your arcs alternating between blue and green paint.  4.)  Paint tops and bottoms of both shoes.  Allow to dry before next step.

5.) Cut large and medium size flowers from stencil.  Place large flower stencil on the center of the largest area on the outside of each shoe.  6.) Use a stipple or stiffer brush to stencil red paint into petals.  Allow to dry to tacky before removing stencil.  Repeat for second shoe.  Use the smaller stencil on the insides of shoe to add a slightly smaller red flower in the center of the largest area as in picture. 7.) Add a yellow dot to the center of each flower with a tiny white accent. You can opt to draw the outline for the vines/leaves on with a pencil if you prefer, then paint the green details.  A finely tipped paintbrush works best.    8.) Remove tape and commence dancing!  Hooray!

That's all there is too it!  I am so seriously smitten with these shoes and I can't wait for an excuse to wear them.  Is grocery shopping out of the question?  Hee.
Did you like the D and G Sicilian Folk Art Spring/Summer collection or was it a little too over the top for your taste?  Do tell!
Visit iLoveToCreate on Facebook and share your creations!
For more fashion and style inspiration, visit me at DIY Doyenne!
Cheers,
Madge

Monday, June 3, 2013

DIY Pinch and Twist Technique


 This DIY Pinch and Twist Beach Cover-up Shirt can be created in under ten minutes!  As a fair skinned gal, I always cover up at the beach and often with a large men's shirt.  They're comfy, cool and can be worn in the water.  It was super easy to give this plain white shirt a little pizzazz with Tulip Fabric Spray.  This is a whole new way to approach tie dye, using a spray instead of a bottle and your finger tips instead of rubber bands.
You will need
100% cotton man's shirt
Tulip Fabric Sprays in Metallic Silver, Metallic Gold and Fucshia
DIY Pinch and Twist Technique from DIY Doyenne TV for iLovetoCreate.com
1.) Make sure your shirt is pre-washed to remove sizing.  2.)  Grasp shirt in spot where you want to center your pinch and twist.  Twist shirt in a clockwise direction.  3.)  Hold silver spray 12" from shirt and give it a few spritzes.  4.)  Repeat to make three total pinched sections.  5.)   Repeat with gold spray turning your twists counter clockwise. 6.) Repeat a final time using pink spray and turning clockwise.  7.)  Allow shirt to dry for 72 hours before washing and 4 hours before wearing. 
 We'd love to see what you make with Tulip Fabric Sprays and the Pinch and Twist technique, be sure to join the iLoveToCreate.com Facebook page and share your projects with us!  
Visit DIYDoyenne.com for more fashion and style and DIY Doyenne TV from Margot Potter on YouTube!
Cheers,
Margot (a.k.a.: Madge)