This Trompe L’Oeil Necklace T-Shirt DIY is a fun way to add a simple pattern to a basic t-shirt. Inspired by the black drawn necklaces on t-shirts by Yves Saint Laurent, this is not only a fun DIY to make it’s also a lot cheaper!
Read more »
Showing posts with label DIY Fashion. Show all posts
Tuesday, August 20, 2013
Wednesday, August 14, 2013
How-to Make Fabric Bows
When Avalon started buying fabric bows last month, I chimed in with my mantra (insert eyeroll...here), "Why buy it, when we can make it ourselves?" Yes, it's more fun than a barrel of glitter living with me. Still, I persevered and Avalon agreed to humor me. We grabbed some lovely fabric and proceeded to whip up a bevy of beautiful bows that could be used for all sorts of fun DIY projects. Hair bows? Check. Shoe bows? Check. Bow ties? Uh, check. These are so easy to make and so adorable, you'll find it very addicting. Plus, Aleene's Fabric Fusion Peel and Stick Tape means no waiting for glue to dry or burning your fingers on hot glue! What's not to love?
Tuesday, August 6, 2013
DIY Zipper Bracelet With Chains
Gold chains and a punk rock revival are huge trends for fall. So why not add a little edge to your accessories with this DIY Zipper Bracelet with Chains. Using two zippers with the chains in between makes this a wide statement bracelet. Have fun and show your edgy side, stack it with more gold chains or wear it alone, either way you’re sure to make an impact.
Friday, August 2, 2013
Make your own rolling stamp
The best art is oftentimes the one without any rules, that's why this technique using a lint roller as a rolling stamp is so cool! It's fun and experimental and you can great for creating abstract backgrounds for your mixed media and fabric paint projects! Kathy a.k.a. Crafty Chica introduced me to this technique through her Quick Tips video she did below. The most awesome thing about this creative stamp is that you can a wide variety of stamps for under $2...what a score!

and

Read more »

and

Tuesday, July 16, 2013
DIY Jeans with Printed Cuffs

Sometimes a simple solution can be the best, I love the subtle color and pattern on these DIY Jeans with Printed Cuffs. For those who don’t want to wear an allover printed pair of jeans this is a perfect solution. A subtle pop of color at the ankles adds an unexpected touch and just the right amount of color. Combine them with this seasons brightly colored jeans, you'll have a fun and on trend pair of DIY Jeans with Printed Cuffs.
Monday, July 15, 2013
DIY Nautical Sailor Shorts & Belt DIY
We always have something new and exciting going on here at iLoveToCreate and instead of coordinating the craft designer projects and schedules like I normally do, I got to be the designer for a day! The entire design studio was challenged to create a pair of DIY shorts and I got to join in! Since I love all things nautical..anchors, lobsters, ropes, seahorses, etc., I knew I wanted to add that flair to my shorts! Here's how you can unleash your inner Gilligan and make your own sea-worthy pair along with a super easy-to-make rope & ribbon belt!
Read more »
DIY Candy Crush Sandals
True Craft Confession: I bought these plastic gems at Michaels a few weeks back with plans to use them for a mosaic inspired fashion DIY. I've had these espadrilles for a while, but I never wear them because they're kind of boring. It wasn't until I took the pics of the finished sandals that I realized they look just like Candy Crush Saga! Too fun! The colors here are vibrant, not quite neon, but very punched up. You could use clear foil backed stones for a totally different effect. I tried a variety of adhesives, but the best by far was Aleene's 7800. It sets quickly and it's thick, so the stones don't slip around on the straps while they dry. Take your time and work methodically. I tried picking the stones up and dipping them in the glue, but I found that spreading the glue on with a crayon and placing them by hand worked best. When you finish, just shave off the end and your crayon will be back in business!
Wednesday, July 10, 2013
DIY Embellished Retro Sunglasses
We're loving the embellished sunglasses trend from the Spring/Summer runways. These 3-D glasses give a generous nod to the cat's eye glasses from the 1950s and early 1960s. They let you step out a little bit into Funky Town without taking up permanent residence.
and
Tuesday, July 9, 2013
DIY Dip Dye Skirt
Create a cute and breezy Dip Dye Skirt for summer with inexpensive fabric and Tulip’s Liquid Dye. I love using unexpected materials for projects (this fabric is actually for home furnishings), but the print was so cute all I could think of was making something to wear out of it. This is the first time I’ve tried Tulip’s Liquid Dye and I think I’m a convert! This stuff is amazing! The best part is how quickly you get a great strong color and there’s very little to rinse out! It’s so easy to use, you’re going to love it too!
Monday, July 8, 2013
Striped, Strapless No-Sew T-Shirt, DIY.
I have been trying to come up with new, no sew T- shirts in different styles, and while I was experimenting on a no sew skirt this weekend, I came up with this cute no sew strapless shirt.
I used Tulip Neon Fabric Sprays to help me create a beautiful stripped pattern.
You could wear this with your favorite jeans, shorts or even use it as a beach cover up.
The best part is there is no sewing involved.
Sunday, July 7, 2013
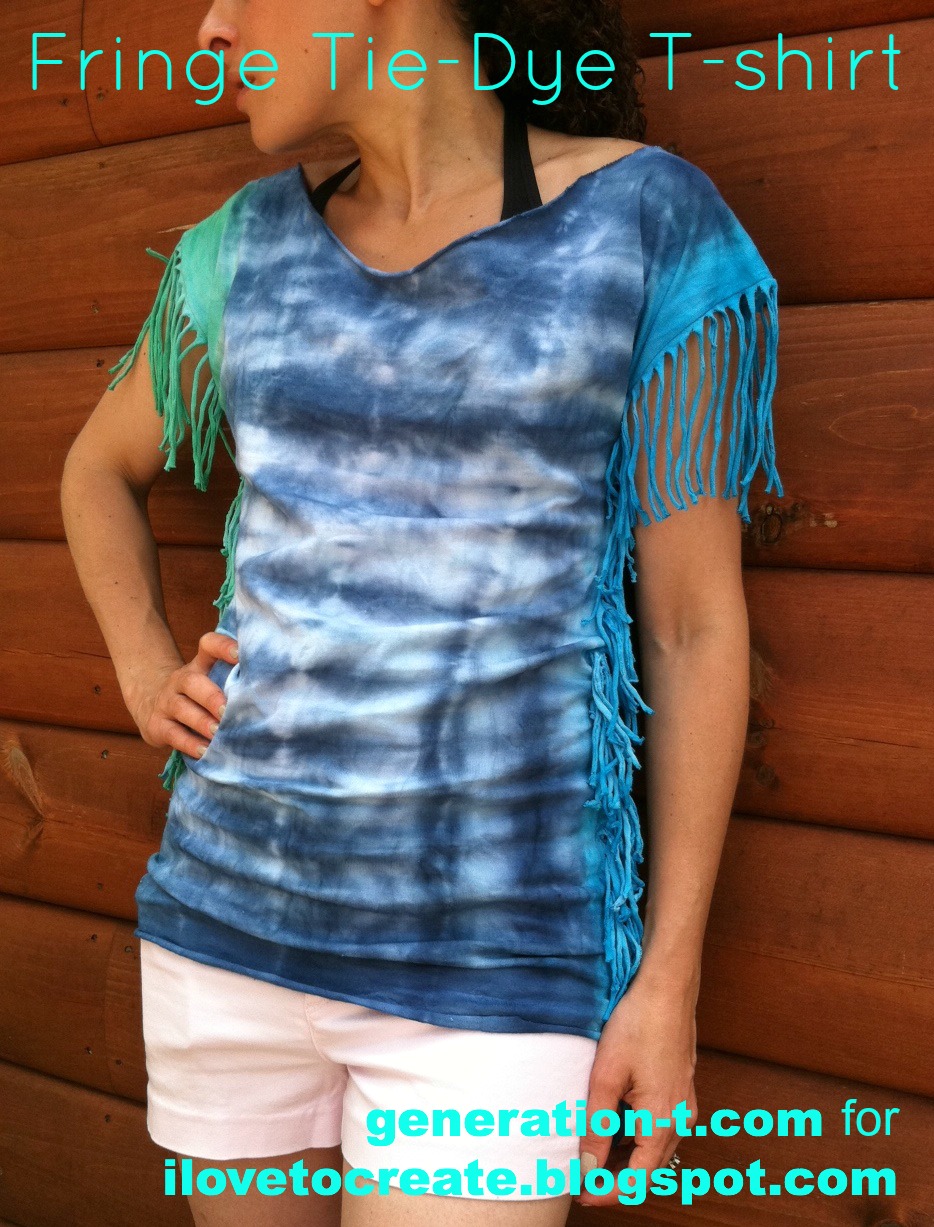
Altered Tie-Dye T-shirt Challenge Featuring Megan of Generation T
While most fringe T-shirts have the fringe tailing off the bottom, I went with horizontal fringe on this one. The side fringe gives nice movement and flow to the tee, and it's a great project for making a slightly-too-big T-shirt into a just-right T-shirt. Add a touch of ombre tie-dye, and it's a perfect summertime staple. Throw it over your bathing suit, and head beachward!
Read more »
Saturday, July 6, 2013
Neon Ombre Heart Freezer Paper Tee
Are you in love with the neon trend as much as I am? I don't know about you, but I'm not an all-over neon color girl. Neon is best for me when used sparingly! That's why I made this cute neon heart tee. It's just the right amount of neon to rock and it's super easy to make using the Tulip Neon Fabric Spray paints!
Read more »
Friday, July 5, 2013
Candy Crush T-shirt Tote Bag
I love a little bit of bling during the summer, so when I saw a giant bag of rhinestones at the craft store the other day, I knew I had to make something fabulous with them. Inspired by all the crazy Candy Crush talk in my family and at the office, I made this colorful and sparkly bag! It's the perfect tote to match my Candy Crush Color Bomb ring I made last week. Here's how you get the fun look for yourself!


What you need:
– Plain large t-shirt in grey
– Large rhinestones (you can buy value packs at the craft store)
– Sewing machine
– Various ribbons
– Painter's tape
– Scissors
– Wax Paper
Cut out your tote back from a plain shirt! This a great way to revamp that old tshirt in your closet. As you can see, the bag is already taking form with just a few cuts.
Sew the bottom of the bag shut with your sewing machine. You can also hand sew if you don't have a machine.
Rip off a sheet of wax paper and insert inside of the bag. It's there to protect the other side of the bag when you glue.
Rip off a few pieces of the masking tape and make a giant rectangle with the tape on the front of the bag. Arrange your gems in Candy Crush fashion. Make sure to have some in groups of three or four just like the game!
Now apply a small amount of Fabric Fusion to the back of each rhinestone gem and press in place.
Remove the tape guideline around your piece and let dry.
Cut several pieces of ribbon in 2 feet sections for each. Gather together and tie around the handle for a fun and whimsical touch to your bag. I also added my little Color Bomb ring I made last week as a cool accent to my bag.
Here's a couple details of my bag!
It's going to be my new summer market tote/ So sparkly and fun!
Wednesday, July 3, 2013
Altered Tie-Dye T-shirt Challenge featuring Jeshua of Boi from Ipanema
When I was a kid, I use to be like, totally OBSESSED with ancient Egyptian culture.
I would spend hours at the library, reading books about Pharaohs and mummies and Nefertiti
*kids be like "Whaaat? What's a li-berry?*.....
A few of my favorite movies are The Prince of Egypt, The Ten Commandments and Cleopatra. All completely accurate tellings of ancient Egyptian culture, amirite?
I was completely enraptured with the mystique and magic of a great civilization, lost in time.
I've always considered traditional Egyptian chest-pieces super cool and interesting. Those Egyptians were ahead of their time, style included. I was inspired to do my own take on the chest piece look that can be dressed up for a night out or paired with a denim shorts or leggings for a more casual look great for both guys and girls.
Here's what you'll need:
-White cotton t-shirt
-Spray bottle
-painter's tape
Lay out your shirt and with your painter's tape, mark off a point about mid chest. I've found that marking off the "dye limit" point will help keep the collar at a reasonable place, because once you get going, it's kinda hard to cut yourself off! lol
Mix up your dyes and add the colors in alternating rings to DRY fabric. The key to this technique is to add the dyes in a clean "dots and dashes" pattern. Make sure that there is space between each dot of color and each section of your collar because the dye will need room to spread. If the colors are too close together, the end result may be more muddy than majestic and no one wants that to happen, right?
Thoroughly spray the collar of your tee to blend the colors. Try to keep the water ONLY on the dyed areas. The dyes will spread to any part of the fabric that's wet so you don't want the colors to spread too far down the tee. The goal is too keep the colors about mid chest to give the appearance of the Egyptian-styled chest piece.
Allow the shirt to rest for about 6 hours to ensure that the dyes really soak in and the fabric absorbs all of the pigment. Then wash according to instructions and wear!
I hope your new shirt makes you feel like a rad Pharaoh King slash Queen of the Nile because you will definitely turn some heads rocking this tee!
Until next time,
ttyl.
Jeshua
Check out more of my posts at boifromipanema.com
Tuesday, July 2, 2013
Altered Tie-Dye T-shirt Challenge featuring Cathy of Trinkets in Bloom
Summer and tie dye just seem to go perfectly together and this DIY Tie Dye Beach Cover Up, made using Tulip’s Tie Dye Kit, is just the thing you need to keep cool and chic on the beach this summer! And with a fun contrast trim, you can easily wear this dress for lunch or drinks after a day of sunning! Stay cool!
TOOLS & MATERIALS:
1 T-shirt (Large/long enough to fit you like a short dress.)
1 Tulip Tie Dye Kit (I used Moody Blues)
Scissors
Sewing machine
Pins
Ruler or tape measure
Ric rac or other trim (optional)
step 1
Prepare your dye and the space where you will be dyeing your shirt.
I used my bathtub, but if you have a space where you can do it outside, that would work too.
First I laid down a large trash bag, then two layers of paper towels to catch the drips. Then I used a baking rack on top. The baking rack it really great to keep your fabric from sitting in the dye which can be bad especially if you’re using more than one color.
Fill the bottle with the dye powder up to the fill line with water and shake.
step 2
Time to tie your shirt.
I used an accordion pleat to make this design.
Lay your shirt out flat and make vertical pleats about 1.5 inches wide.
When your shirt is all pleated, wrap rubber bands about every 3 inches.
Make sure your rubber bands are very tight.
step 3
Lay your shirt on the baking rack you’ve prepared for dying.
Squeeze the dye onto your shirt in the center of each section.
Let your dye set for 6-8 hours. The longer you let your dye sit the stronger
and darker your color will be.
step 4
When your dye is ready cut off your rubber bands and rinse your shirt.
Keep rinsing your shirt until the water runs clear. (This can take awhile.)
Then wash and dry your shirt according to the instructions that came with your dye.
step 5
Lay your shirt out flat and measure where you will cut.
You can also put your shirt on and pin along the neck where you want to cut.
Use a ruler or tape measure to make sure you cut a straight line from your neck to your arm hole.
TIP: Make the back side a little wider than the front.
step 6
Cut around the neck band on the sides and down in a straight line to the arm hole.
Do this for both sides.
step 7
Turn your shirt inside out and try it on.
Pin the sides of your shirt to fit snugly under your your arms, this will keep the armholes from gaping.
Take your shirt off and lay it out flat.
Use your tape measure to make a straight line from where you pinned your arm hole to the bottom hem of your shirt.
step 8
Using your sewing machine, sew a straight seam down each side of your shirt where you pinned it.
Before you turn it right side out or cut anything try it on again to make sure it fits the way you want.
Then cut off the extra fabric on your seams.
step 9
After all my sewing and cutting I couldn’t help but want to add something else. RIC RAC!!!
(Fortunately I had this great hot pink large ric rac just waiting to be used!)
Pin your ric rac to the bottom of your shirt and around your armholes.
Use your sewing machine very carefully sew your ric rac on right down the center of it and right along the edge of your shirt.
For more fashion DIY's from Trinkets in Bloom click here.
Add some sunnies, cute flip flops, sunshine and you’re ready for a day at the beach!
Subscribe to:
Posts (Atom)


.jpg)