Showing posts with label diy. Show all posts

Wednesday, August 21, 2013

Chevron Ombre Pillow Case

I've never been happier about gas than I am right now. I don't usually get excited when I hear the work chevron because all I seem to think about is the big bold red and blue shape that takes all of my moolah.  However there is one thing I get really excited about and that is fabric paint. You can do so many great things with tulip fabric paint! Shapes, patterns and designs that are in your head can finally come to life. No special orders, no waiting for someone to make it, just you and the paint. That is all you need to create fun awesome things! Today we are making a chevron ombre pillow case that you can throw on a bed, couch or outdoors like I did.
1,2,3 LET GO!

Read more »

Tuesday, August 20, 2013

Trompe L'Oeil Necklace T-Shirt DIY

 This Trompe L’Oeil Necklace T-Shirt DIY is a fun way to add a simple pattern to a basic t-shirt. Inspired by the black drawn necklaces on t-shirts by Yves Saint Laurent, this is not only a fun DIY to make it’s also a lot cheaper! 
Read more »

Monday, August 12, 2013

Strapless, No-Sew T-shirt #2, DIY


Happy Monday to you all.
 I am trying to squeeze every last moment I can out of Summer,
so I have been experimenting with a few strapless no sews over the last week.
When you add a little Tulip Gold- Glitter Fabric Paint  
 you have your very own unique creation.
I hope you have as much fun making this top  as much as I did.
Read more »

Thursday, August 8, 2013

DIY Tie Dyed Tissue Paper


It's almost time to start slowly "wrapping" up Summer so I wanted to create something light, fluffy and fun for you. We all have special occasion's in our life whether it's a wedding, birthday or anniversary. Maybe you like to give back to school gifts to teachers or a simple gift to a special person in your life. Today I will show you how to make that gift a little more unique with Tie-Dyed tissue paper. Sure you can go out and buy some boring solid colors but how cool will it be when you tell someone you created that tissue! I am pushing things a little further by using tissue paper as wrapping paper, so come on let's get started!
Read more »

Tuesday, August 6, 2013

DIY Zipper Bracelet With Chains


Gold chains and a punk rock revival are huge trends for fall. So why not add a little edge to your accessories with this DIY Zipper Bracelet with Chains. Using two zippers with the chains in between makes this a wide statement bracelet. Have fun and show your edgy side, stack it with more gold chains or wear it alone, either way you’re sure to make an impact.

Read more »

Tuesday, July 16, 2013

DIY Jeans with Printed Cuffs


Sometimes a simple solution can be the best, I love the subtle color and pattern on these DIY Jeans with Printed Cuffs. For those who don’t want to wear an allover printed pair of jeans this is a perfect solution. A subtle pop of color at the ankles adds an unexpected touch and just the right amount of color. Combine them with this seasons brightly colored jeans, you'll have a fun and on trend pair of DIY Jeans with Printed Cuffs.

Read more »

Tuesday, July 9, 2013

DIY Dip Dye Skirt


Create a cute and breezy Dip Dye Skirt for summer with inexpensive fabric and Tulip’s Liquid Dye. I love using unexpected materials for projects (this fabric is actually for home furnishings), but the print was so cute all I could think of was making something to wear out of it. This is the first time I’ve tried Tulip’s Liquid Dye and I think I’m a convert! This stuff is amazing! The best part is how quickly you get a great strong color and there’s very little to rinse out! It’s so easy to use, you’re going to love it too!

Read more »

Get fun tie dye techniques and inspiration over at Kollabora today!

 We've partnered up with the cool DIY site Kollabora for an exclusive post all about tie dye inspiration!  See how to get the hottest fashion looks you are seeing online and in department stores, but for much less!

Read more »

Tuesday, July 2, 2013

Altered Tie-Dye T-shirt Challenge featuring Cathy of Trinkets in Bloom


Summer and tie dye just seem to go perfectly together and this DIY Tie Dye Beach Cover Up, made using Tulip’s Tie Dye Kit, is just the thing you need to keep cool and chic on the beach this summer! And with a fun contrast trim, you can easily wear this dress for lunch or drinks after a day of sunning! Stay cool!


TOOLS & MATERIALS:

1 T-shirt (Large/long enough to fit you like a short dress.)
1 Tulip Tie Dye Kit (I used Moody Blues)
Scissors
Sewing machine
Pins
Ruler or tape measure
Ric rac or other trim (optional)


step 1
Prepare your dye and the space where you will be dyeing your shirt.

I used my bathtub, but if you have a space where you can do it outside, that would work too.

First I laid down a large trash bag, then two layers of paper towels to catch the drips. Then I used a baking rack on top. The baking rack it really great to keep your fabric from sitting in the dye which can be bad especially if you’re using more than one color.

Fill the bottle with the dye powder up to the fill line with water and shake.

step 2
Time to tie your shirt.

I used an accordion pleat to make this design.

Lay your shirt out flat and make vertical pleats about 1.5 inches wide.

When your shirt is all pleated, wrap rubber bands about every 3 inches.
Make sure your rubber bands are very tight.

step 3
Lay your shirt on the baking rack you’ve prepared for dying.

Squeeze the dye onto your shirt in the center of each section.

Let your dye set for 6-8 hours. The longer you let your dye sit the stronger
and darker your color will be.

step 4
When your dye is ready cut off your rubber bands and rinse your shirt.

Keep rinsing your shirt until the water runs clear. (This can take awhile.)

Then wash and dry your shirt according to the instructions that came with your dye.

step 5
Lay your shirt out flat and measure where you will cut. 

You can also put your shirt on and pin along the neck where you want to cut.

Use a ruler or tape measure to make sure you cut a straight line from your neck to your arm hole.

TIP: Make the back side a little wider than the front.

step 6
Cut around the neck band on the sides and down in a straight line to the arm hole.
Do this for both sides.

step 7
Turn your shirt inside out and try it on.

Pin the sides of your shirt to fit snugly under your your arms, this will keep the armholes from gaping.

Take your shirt off and lay it out flat.

Use your tape measure to make a straight line from where you pinned your arm hole to the bottom hem of your shirt.

step 8
Using your sewing machine, sew a straight seam down each side of your shirt where you pinned it.

Before you turn it right side out or cut anything try it on again to make sure it fits the way you want.

Then cut off the extra fabric on your seams.

step 9
After all my sewing and cutting I couldn’t help but want to add something else. RIC RAC!!!

(Fortunately I had this great hot pink large ric rac just waiting to be used!)

Pin your ric rac to the bottom of your shirt and around your armholes. 

Use your sewing machine very carefully sew your ric rac on right down the center of it and right along the edge of your shirt.
For more fashion DIY's from Trinkets in Bloom click here.

Add some sunnies, cute flip flops, sunshine and you’re ready for a day at the beach!

Tuesday, June 4, 2013

DIY Rocker T-Shirt

Using the Tulip Screen-it and some scissors you can turn a boring t-shirt into a fun printed tank for summer. For this project I used one of my husbands old t-shirts, since it’s a little large, once it’s tied it works perfectly. The t-shirt I used has David Bowie on it, so I created a graphic of a lightning bolt and used the Tulip Screen-it which is really easy! I was amazed! Follow the instructions on the ILTC website and you’ll be able to create your own awesome t-shirt designs in no time!
TOOLS & MATERIALS:
1 T-shirt a few sizes larger than normal
Graphic image
Scissors
Ribbon
Timer
Sponge
step 1
Choose your design and print it out in black ink. It’s very important that your image is dark.

Find a room in your house that you can make a dark room. Cover every possible place that light could get in.

Set up a plastic bin with enough water to soak your film once you’ve burned your screen or use your tub, if your bathroom works best for your darkroom. That’s what I did.

Once your room is ready, use the yellow light bulb as your only source of light.

Be sure to have all your supplies with you, Aleene’s Tacky Spray, your films, your graphic, the Screenit, squeegee and a timer before you get started.

step 2
Spray the base of your Screen-it with the Aleene’s Tacky Spray and place your film on top of the base. Use your squeegee to smooth out any bubbles.

Next, spray the design side of your graphic with the Aleene’s Tacky Spray and place it graphic side down on your film.

Place the frame and the top of the Screen-it on top of your graphic.

step 3
Turn on your Screen-it for 8 minutes.

When your 8 minutes are up lift the top of your Screen-it, rotate it 180 degrees, set it back on top and turn it on for another 8 minutes.

You will use your Screen-it for a total of 16 minutes.

step 4
When that is finished, peel your graphic off your film and submerge your film in your pan or tub of water and let sit for 10 minutes.

This is where you’ll see your design emerge!

step 5
When your 10 minutes are up, lay your film on top of the base from your Screen-it and using a sponge (soft side only) rub your film under running water.

This will loosen the emulsion on your film, revealing your image.

Let your film dry.

For more detailed instructions on using the Screen-it click here.

step 6
Now you’re ready to print your shirt.

Lay your t-shirt out on a flat surface.  

Use the base of your Screen-it inside your shirt, this will provide a hard surface to screen on and keep any paint from soaking through.

Spray the area of your shirt with Aleene’s Tacky Spray and place your film on top.

Place the frame of your Screen-it on top of your film. 
step 7
Apply a generous amount of your Tulip Soft Fabric Paint across the top of your design.

Hold the top of your film with one hand and use your squeegee to pull the paint across your design with your other hand. Be sure to add even pressure with your squeegee as your pull it across.

You may need to do this a couple of times. Depending on the color of your shirt and your paint.

My image is a bit light, since I used silver paint on a dark gray t-shirt, but I wanted a vintage faded look. Using lighter colored t-shirts will give you a stronger color with your fabric paint.

Let your image dry.

Be sure to rinse out your film when you are done, it can be reused many times!
step 8
Now you’re ready to cut your t-shirt.

Lay it out flat and cut off the sleeves and the bottom band.

Cut the neck in large scoop shape, you can go slowly with this and keep trying it on as you go. That will keep it from getting too big to wear.
Cut the back of your t-shirt lower than the front.
step 9
When your t-shirt is cut the way you want it, you’re ready to tie the back.

Using a ribbon or the bottom strip of your t-shirt or whatever you like, wrap your two back shoulder straps with your ribbon and tie in a bow.
 
step 10
The front of my t-shirt was puckering a bit (since I’m not much of a busty gal) I used Aleene’s Fabric Fusion to hold small tucks on either side of the neckline.

I also used the Fabric Fusion to hold the bow, just a few drops inside the knot, to keep it from untying.


I had so much fun using the Screen-it, in a really short time you can create fun graphics for t-shirts and so much more! Also, this way of turning a t-shirt into a tank is a great way to keep those old t-shirts from ending up in the rag pile! You could also use small adult or teen sizes to make tops or dresses for girls! I guess I know what my daughter will be wearing this summer!

To see more DIY fashion be sure to check out my blog at Trinkets in Bloom.

Friday, May 24, 2013

12 Crafty Uses for Corks

Do you have a collection of corks and don't know what to do with them?  These little winestoppers are the perfect thing to craft with and will add a rustic, yet functional and decorative charm to your home! We've rounded up some great projects using corks, a little glue, and a lot of creativity!  Check them out! 
Line the inside of a tray with corks and add a painted monogram touch in this cork tray project from Pattiewack for iLoveToCreate.
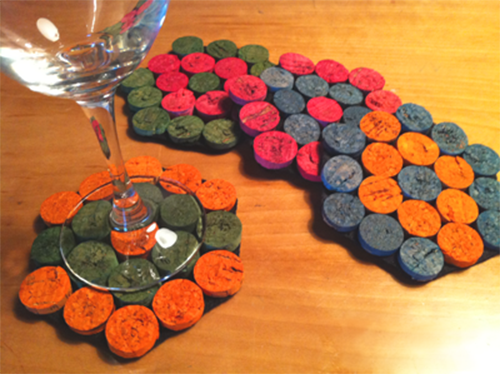
How about dipping your corks in dye (Tulip Tie Dye would be a good bet) and piece them together like blogger DIY Trix did for these cork coasters.
Corks make a pretty planter with personality. Make this cork flower pot planter with The WineABe.
Pattiewack made these super cute keychains using an eye screw, cork, and keychain ring. Super fun, easy and crafty!  And a great (and cheap) gift to give to your girlfriends!
Made by Girl made this awesome monogrammed letter using corks to personalize her room.
This cork necklace from Family Chic is such a cool way to use corks for jewelry.
This wine corkboard by Vinyl & Vinyl makes a great organization board.
April Agnes made mini wine cork succulent planters using corks. 
Make sneaky snakes using corks with Sophie World.
Corks make great stamps like these from Family Sponge.
Wine Folly shows you how to make a wreath out of wine corks.  Such a cool idea that makes a statement!
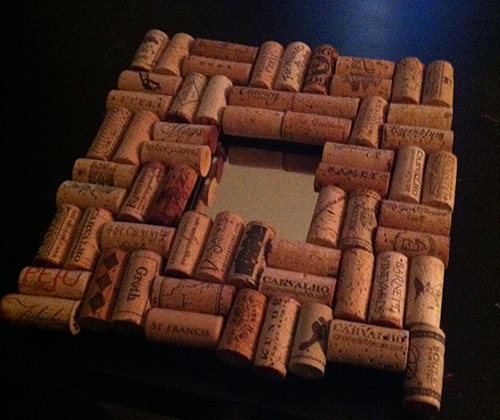
Layer corks around a mirror like The Lipstick Giraffe did in this project.

We simply love cork projects. Which one of these was your favorite?