Turn a tired old lampshade into a mid century modern inspired DIY Tiki Fabric Lampshade with this cheap and easy project! We bought this lampshade at Ikea years and years ago. Alas, it got a tear in it on our last move. No worries, Aleene's Fabric Fusion made quick work of giving this sad old lampshade a much needed makeover. Avalon is redesigning her room with a beach theme, I had this kitschy pin up boys fabric from a project in one of my books several years ago. You can easily find Tiki or mid century inspired fabrics on the internet or at craft and fabric shops, bark cloth would be fabulous here! Avalon and her Dad made this project while I was out of town on business and I have to say, they did a smash up job!
Showing posts with label DIY Decor. Show all posts
Showing posts with label DIY Decor. Show all posts
Wednesday, July 24, 2013
Tuesday, July 23, 2013
How to: Paint a Cityscape with Tape
Though my motivation was nursery decor (inspired particularly by my son's love for taxis and trucks -- hey, we live in Brooklyn!), this technique could easily be applied to any shapes that benefit from a grid-like treatment -- like robots, or alphabet tiles, or basic shapes. I was inspired by the geometry of the landscape where we live, but your cityscape could be urban or rural (or suburban, for that matter!). The tape technique works like any resist--I love the batik-like result, and the effect, as I mentioned, could be applied to any subject matter, to suit any room in the house!
Read more »
Friday, June 7, 2013
Shibori Summer Sheets!
Summer is here and my bedroom needed a makeover! I've been doing a new tie-dye video every week and now it was time to give my bed some rainbow love!
Here is what you need:
PVC pipe, about 24" long
Rubberbands and twine or string
Scissors
Scissors
Here is my video on how to tie-dye your sheets! My suggestion is to get at least 6-8 bottles ofr a queen set, that's what I did. I LOVE how my sheets turned out. I decided at the last minute to use some Tulip® Fabric Spray Paint™ and add stenciled designs...
LINK
Tuesday, June 4, 2013
Fingerprint Balloon Pillow
I long time ago I came across a cute poster with a bike that had balloons tied to it. I thought it would make a great pillow and our pillow covers are really worn out. Here's how it came out.
I started with a blank pillow cover which I found at Ikea. It was a few dollars and it has a nice zipper in it which is great for washing. I created a freezer paper stencil of a bike. (If you've never tried freezer paper stenciling I have a how to video HERE.) You cut the paper and then iron it onto the fabric to seal it on. I usually use paint with these stencils, but I thought I'd go for fabric markers this time around.
With a stencil it's super easy. Even if you color out of the lines, it won't show because the stencil is forgiving.
Peel it off and your image is perfect. After I removed the stencil I added a few lines for balloon strings.
Then colored my finger with Tulip fabric markers and stamped it to create ballooons.
I also use the Scribbles fabric stamp pads to get a wider variety of colors. The finger stamping is really easy. You can't do it incorrectly.
And here's the finished pillow.
I think it would make a cute shirt as well.
Thursday, May 30, 2013
DIY Screen Printed Canvas
Small canvases are very inexpensive at the craft stores. With just a little effort, they can pack a big design punch! This time around I've used some graphic Ikat style fabric, which we stretched and stapled around the original canvas. Then I created a pretty permission free graphic (you'll find it below) that I burned on a screen using the Tulip Screen-It. This was so easy to do and if you follow the video instructions on the ILTC website, you'll have a stunning screen you can use up to 75 more times! Simply fabulous!
You will need:
12"x12" blank canvas
Black Tulip Soft Fabric Paint
Aleene's Repositionable Tacky Spray
Painter's Tape
Staple Gun and Staples
1.) Print your image in black ink. Set yourself up in a light free room with the ScreenIt and a small lamp with the yellow bulb provided in the machine. Turn off over head light and turn on yellow bulb. You'll need to spray the platform, place the screen on the platform. Use squeegee to remove any air bubbles. Spray your image, place image down on screen, use squeegee to remove any air bubbles. Place cover on top, turn machine on and burn screen for 8 minutes. 8 minutes later, turn top of machine 180 degrees, turn back on and burn screen for an additional 8 minutes. 2.) Soak screen in a tub of cool water for 10 minutes. Gently rub the emulsion off of the burned areas with your fingers while screen is submerged. Remove from water and use a soft sponge to remove remaining emulsion from the burned areas, you can do this on your printing platform. 3.) Set the screen on a towel to dry. 4.) Cut fabric to fit around edges of canvas.
5.) This is a two person job, really, but you can do it alone if you work slowly and methodically. Stretch fabric tight and staple, start with the center and work out to sides, three staples per side is good. To get the sides done, you will need to cut a little square off of one side of the folded fabric, then tuck, fold and staple. 6.) Tape the screen flat to the front of your canvas with painter's tape. Make sure there are no bubbles, you don't want the paint to spread outside of the printed areas. 7.) Place canvas on Screen-It platform. Squirt out a thick line of paint and squeegee it across the screen. 8.) Remove tape and screen and let your canvas dry. Here is the image I used, just right click and save to your computer. Print to fit 8.5x11 in jet black ink.
It's so much fun to screen print, you may find it just a little addicting. I'm thinking about using my screen on some t-shirts and maybe even some pillows for our outdoor porch. Have you ever screen printed? What would you like to create with the Tulip Screen-it?
Get more great DIY tutorials on iLovetoCreate.com and find more DIY Fashion and Style at DIYDoyenne.com!
Cheers,
Madge
Friday, May 24, 2013
12 Crafty Uses for Corks
Do you have a collection of corks and don't know what to do with them? These little winestoppers are the perfect thing to craft with and will add a rustic, yet functional and decorative charm to your home! We've rounded up some great projects using corks, a little glue, and a lot of creativity! Check them out!
Line the inside of a tray with corks and add a painted monogram touch in this cork tray project from Pattiewack for iLoveToCreate.
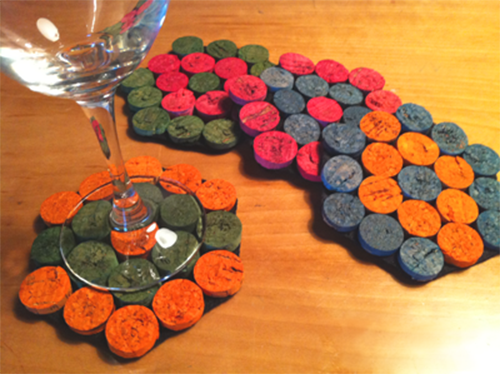
How about dipping your corks in dye (Tulip Tie Dye would be a good bet) and piece them together like blogger DIY Trix did for these cork coasters.
Corks make a pretty planter with personality. Make this cork flower pot planter with The WineABe.
Pattiewack made these super cute keychains using an eye screw, cork, and keychain ring. Super fun, easy and crafty! And a great (and cheap) gift to give to your girlfriends!
Made by Girl made this awesome monogrammed letter using corks to personalize her room.
This cork necklace from Family Chic is such a cool way to use corks for jewelry.
This wine corkboard by Vinyl & Vinyl makes a great organization board.
April Agnes made mini wine cork succulent planters using corks.
Make sneaky snakes using corks with Sophie World.
Corks make great stamps like these from Family Sponge.
Wine Folly shows you how to make a wreath out of wine corks. Such a cool idea that makes a statement!
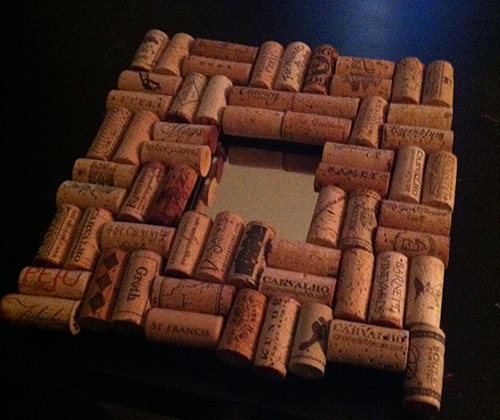
Layer corks around a mirror like The Lipstick Giraffe did in this project.
We simply love cork projects. Which one of these was your favorite?
Subscribe to:
Posts (Atom)


