Editors note: All this week, we will be hosting an Altered T-shirt challenge featuring some of our iLoveToCreate bloggers! They were each sent a Tulip One-Step Tie Dye kit and Gildan t-shirt to distress, hack, cut up and alter to their heart's desire. Have fun with us this week as we share four different looks from four awesome designers. And check back with us in the future as we plan to have more challenges featuring our other iLoveToCreate bloggers!


I love creating different types of no-sew t-shirts, and when you add tie-dye to them, it just makes them even more unique. Here I am using the
Tulip One-Step Tie Dye kit in Moody Blues. This is the easiest way to tie dye, because all you do is open up the kit, add water and go! There's everything you need for creating the perfect tie-dyed shirt in there!

Fold your shirt in half.
Mark a diagonal line.
Gather that line and rubber band around where you gathered.
Add some rubber bands about 3 inches apart.
Now mix up your Tulip One-Step Tie Dye Bottles. Just add water to the top line of the bottle and shake well until all the powder is dissolved.

Squeeze you colors on your shirt, cover it with plastic, and let sit for 6-8 hours.
Cut your rubber bands and rinse your shirt in the sink.
Then wash in the washing machine following the instructions on the kit.
Now let's have some fun cutting this shirt up!
It's so easy to cut up and restyle and basic t-shirt as you can see.
Cut apart the top strap.
Cut the other sleeve like the picture above!
Cut and stretch the sleeve.
Cut one inch strips down the side of your shirt.
Cut them open.
Now put on your shirt and tie the sides to fit your body. It's the best part cause you can make it to fit your body type!
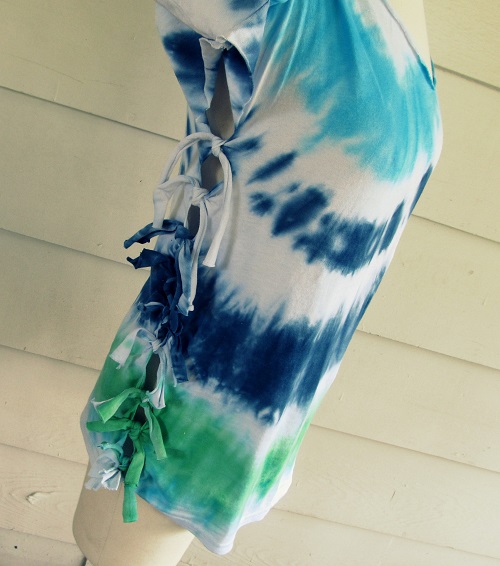
Here's how the sleeves look.
Another view...
Now you have a cute summer shirt for the beach or to wear with your favorite pair of jeans.
For more no-sew t-shirts head over to my blog at
wobisobi.com and click on T-shirt DIYs at
the top of the page.
Lots of love,
Anne