Tuesday, July 2, 2013

Hello Pillow


While in the process of redecorating our family room, I wanted to add some pillows with personality.  This "hello pillow" was super easy to make.  I only needed a printer and my Tulip fabric markers.  Here's how I did it.


I found a telephone picture I liked from the internet and printed it out as large as I could.  I also printed out the word "hello" in a font I liked.  I purchased an inexpensive pillow cover at Ikea.
I placed the papers I printed inside the pillow so that I could trace them.  See how you can see through the fabric to the design?
Then I started tracing....
 ...and coloring.
 And here's a picture of the fabric I'll be using to bring the room together.
 I love a simple, easy project that's easy to personalize.


Altered Tie-Dye T-shirt Challenge featuring Cathy of Trinkets in Bloom


Summer and tie dye just seem to go perfectly together and this DIY Tie Dye Beach Cover Up, made using Tulip’s Tie Dye Kit, is just the thing you need to keep cool and chic on the beach this summer! And with a fun contrast trim, you can easily wear this dress for lunch or drinks after a day of sunning! Stay cool!


TOOLS & MATERIALS:

1 T-shirt (Large/long enough to fit you like a short dress.)
1 Tulip Tie Dye Kit (I used Moody Blues)
Scissors
Sewing machine
Pins
Ruler or tape measure
Ric rac or other trim (optional)


step 1
Prepare your dye and the space where you will be dyeing your shirt.

I used my bathtub, but if you have a space where you can do it outside, that would work too.

First I laid down a large trash bag, then two layers of paper towels to catch the drips. Then I used a baking rack on top. The baking rack it really great to keep your fabric from sitting in the dye which can be bad especially if you’re using more than one color.

Fill the bottle with the dye powder up to the fill line with water and shake.

step 2
Time to tie your shirt.

I used an accordion pleat to make this design.

Lay your shirt out flat and make vertical pleats about 1.5 inches wide.

When your shirt is all pleated, wrap rubber bands about every 3 inches.
Make sure your rubber bands are very tight.

step 3
Lay your shirt on the baking rack you’ve prepared for dying.

Squeeze the dye onto your shirt in the center of each section.

Let your dye set for 6-8 hours. The longer you let your dye sit the stronger
and darker your color will be.

step 4
When your dye is ready cut off your rubber bands and rinse your shirt.

Keep rinsing your shirt until the water runs clear. (This can take awhile.)

Then wash and dry your shirt according to the instructions that came with your dye.

step 5
Lay your shirt out flat and measure where you will cut. 

You can also put your shirt on and pin along the neck where you want to cut.

Use a ruler or tape measure to make sure you cut a straight line from your neck to your arm hole.

TIP: Make the back side a little wider than the front.

step 6
Cut around the neck band on the sides and down in a straight line to the arm hole.
Do this for both sides.

step 7
Turn your shirt inside out and try it on.

Pin the sides of your shirt to fit snugly under your your arms, this will keep the armholes from gaping.

Take your shirt off and lay it out flat.

Use your tape measure to make a straight line from where you pinned your arm hole to the bottom hem of your shirt.

step 8
Using your sewing machine, sew a straight seam down each side of your shirt where you pinned it.

Before you turn it right side out or cut anything try it on again to make sure it fits the way you want.

Then cut off the extra fabric on your seams.

step 9
After all my sewing and cutting I couldn’t help but want to add something else. RIC RAC!!!

(Fortunately I had this great hot pink large ric rac just waiting to be used!)

Pin your ric rac to the bottom of your shirt and around your armholes. 

Use your sewing machine very carefully sew your ric rac on right down the center of it and right along the edge of your shirt.
For more fashion DIY's from Trinkets in Bloom click here.

Add some sunnies, cute flip flops, sunshine and you’re ready for a day at the beach!

Monday, July 1, 2013

Altered Tie-Dye T-shirt Challenge featuring Anne of Wobisobi

Editors note:  All this week, we will be hosting an Altered T-shirt challenge featuring some of our iLoveToCreate bloggers!  They were each sent a Tulip One-Step Tie Dye kit and Gildan t-shirt to distress, hack, cut up and alter to their heart's desire.  Have fun with us this week as we share four different looks from four awesome designers.  And check back with us in the future as we plan to have more challenges featuring our other iLoveToCreate bloggers!


 I love creating different types of no-sew t-shirts, and when you add tie-dye to them, it just makes them even more unique. Here I am using the Tulip One-Step Tie Dye kit in Moody Blues. This is the easiest way to tie dye, because all you do is open up the kit, add water and go!  There's everything you need for creating the perfect tie-dyed shirt in there!
 What you need:
– 100% Gildan Cotton Shirt (Large)
– Scissors
Tulip One-Step Tie Dye Kit (I used Moody Blues)
 Fold your shirt in half.
Mark a diagonal line.
 Gather that line and rubber band around where you gathered.
 Add some rubber bands about 3 inches apart.
Now mix up your Tulip One-Step Tie Dye Bottles. Just add water to the top line of the bottle and shake well until all the powder is dissolved.
 
Squeeze you colors on your shirt, cover it with plastic, and let sit for 6-8 hours.
 Cut your rubber bands and rinse your shirt in the sink.
Then wash in the washing machine following the instructions on the kit.
 Now let's have some fun cutting this shirt up!
 It's so easy to cut up and restyle and basic t-shirt as you can see.
 Cut apart the top strap.
 Cut the other sleeve like the picture above!
 Cut and stretch the sleeve.
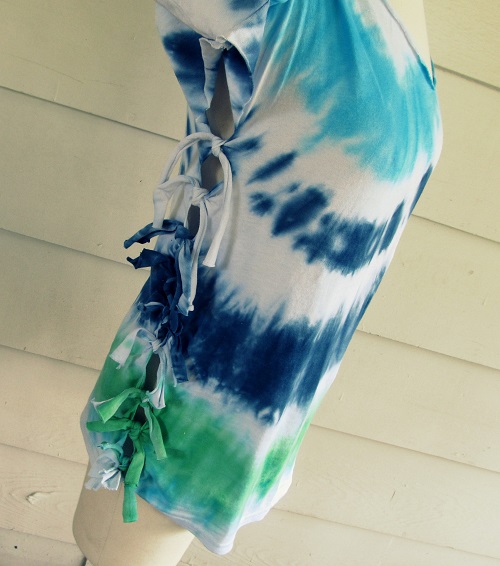
 Cut one inch strips down the side of your shirt.
 Cut them open.
 Now put on your shirt and tie the sides to fit your body.  It's the best part cause you can make it to fit your body type!
 Here's how the sleeves look.
 Another view...
 Now you have a cute summer shirt for the beach or to wear with your favorite pair of jeans.
For more no-sew t-shirts head over to my blog at wobisobi.com and click on T-shirt DIYs at
the top of the page.

Lots of love,
Anne

DIY Floating Pearl Illusion Necklace


It’s wedding season and if you’d like to make ‘something new’ for the bride or her bridesmaids, this classic floating pearl illusion  necklace is surprisingly easy!  We used a strand of lovely freshwater pearls that my husband purchased for me several years ago at the Tucson Gem Show.  By turning them into a floating pearl necklace, we were able to create three necklaces and earring sets, one for me, one for my daughter and one for a gift.  The key here is to use pearls with consistent size, though if you choose baroque style pearls it's also lovely, just different.  This method is so much easier than knotting or using crimp beads and the pearls really appear to float across the neck. It's a wonderful way to update your grandmother’s or mother’s pearls into jewelry the daughters and granddaughters can all treasure.  Layer them up for an even more glamorous appeal! 

You will need:
15 ½” 19-strand silver plated beading wire.
13 10mm round cream pearls
2 EZ-Crimps
EZ-Lobster clasp (or clasp connected with jump ring)
Small heart charm stamped with initial (optional)
2” chain
Permanent marker
Flush cutter
2 pairs chain nose pliers
Bead board
Measuring tape (optional)
Step One: Cut beading wire to 15.5".  The finished necklace is 16” with clasp and includes a 2” extension chain so it is adjustable to 18”. You can do one of two things here, either mark the center of the wire with a marker and use the bead board to make marks on the wire at one inch intervals.  This helps keep the pearls evenly spaced on the design.  (The space between the final pearl and clasp is 1.5".)  Alternately, you can use the tape measure method mentioned in Step Three.
Step Two: Put a small drop of glue on the wire starting at the center mark. 
 I used a metal tape measure as a well to help hold the pearls in place and provide an easy method for maintaining the measurements.  (The glue can be placed about 1/8” away from the targeted mark so it can move into the pearl as you slide it over.)  Slide pearl onto wire allow it to capture the glue as it moves.  Slowly twisting the pearl as you slide over the glue helps to bring the glue into the bead.  Carefully wipe off any excess glue.  Continue to add a pearl at 1 inch intervals.  After finishing one side, repeat the process on the opposite side.  When you finish, take a moment to look at the spacing and make any slight adjustments before the glue sets.
 Allow the glue to set before handling.  While glue is setting, attaching the metal ends using chain nose pliers to secure them on the wire.
Attach the clasp to one end using chain nose pliers.
Attach the extension chain to the opposite end with pliers.  I included a small metal charm stamped with the initial of the wearer, this is a lovely way to customize this design for your bridesmaids or if it’s for a bride, you can add two charms and include the initial of the groom.  If you’d like some easy metal stamping tips, you can get them here.
 That's it!  I suggest you practice a little with some inexpensive faux pearls and once you have the technique down pat (which shouldn't take too long, trust me) you'll be ready to rock and roll.  Aleene's adhesive works on wire and also on clear monofilament and fiber, each of these will produce a slightly different finished look.  
What do you think, has this become a timeless classic?  Would you make and wear a DIY Floating Pearl Illusion Necklace?  We'd love to see it if you do!  Join the conversation on our Facebook page and visit me at DIY Doyenne for more fashion and style!
Cheers,
Madge